Step-by-Step Guide: Configuring Domains and Subdomains on a VPS with Apache

Setting up domains and subdomains on a VPS can be straightforward if you follow the right steps. In this guide, we'll walk you through the process using an example domain Braviy.com and a VPS IP (185.224.139.74). The process includes domain pointing, directory setup, virtual host configuration, and enabling HTTPS for secure connections.
Don't have hosting yet? Get a discount on Hostinger with this link.
Step 1: Point Your Domain to the VPS
Update DNS Records on Your Domain Provider
-
Log in to your domain provider's control panel (e.g., Hostinger).
-
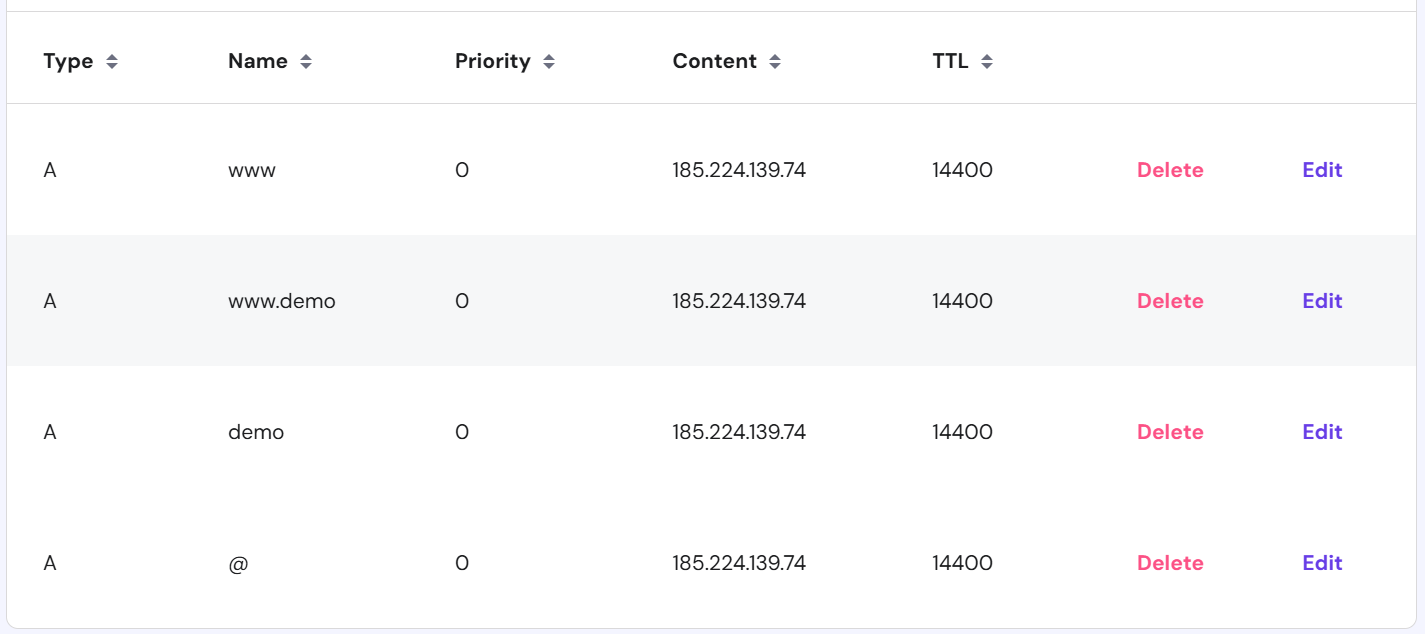
Update the main domain's DNS records:
-
Set the
@(root domain) andwwwrecords to point to your VPS IP. Example: -
@record: 185.224.139.74 -
wwwrecord: 185.224.139.74
-

Add Subdomain DNS Records (Optional)
To create a subdomain (e.g., demo.braviy.com):
-
Create an A record for the subdomain:
-
Record Type: A
-
Name:
demo(fordemo.braviy.com) -
Points to: 185.224.139.74
-
TTL: Default or preferred value
-
-
Optionally, create another A record for
www.demo.braviy.comto avoid SSL errors:-
Name: www.demo
-
Step 2: Configure the Main Domain 💡
Access Your VPS
-
Log in to your VPS using SSH.
Create a Directory for the Main Domain
-
Create the directory:
sudo mkdir -p /var/www/braviy.com/2.Set ownership and permissions:
sudo chown -R www-data:www-data /var/www/braviy.com
sudo chmod -R 755 /var/www/braviy.com
Add an Index File
-
Create a basic HTML file for testing:
sudo nano /var/www/braviy.com/index.htmlAdd the following content:
<!DOCTYPE html>
<html lang="en">
<head>
    <meta charset="UTF-8">
    <meta name="viewport" content="width=device-width, initial-scale=1.0">
    <title>Braviy</title>
</head>
<body>
    <h1>Welcome to braviy.com</h1>
</body>
</html>
Save and exit (Ctrl + O, then Ctrl + X).
Create a Virtual Host Configuration File
-
Navigate to the Apache sites-available directory:
ls /etc/apache2/sites-available/2.Create a virtual host file:
sudo nano /etc/apache2/sites-available/braviy.com.confAdd the following configuration:
<VirtualHost *:80>
    ServerName braviy.com
    ServerAlias www.braviy.com
    DocumentRoot /var/www/braviy.com
    <Directory /var/www/braviy.com>
        Options Indexes FollowSymLinks
        AllowOverride All
        Require all granted
    </Directory>
    ErrorLog ${APACHE_LOG_DIR}/error.log
    CustomLog ${APACHE_LOG_DIR}/access.log combined
    RewriteEngine on
    RewriteCond %{SERVER_NAME} =braviy.com [OR]
    RewriteCond %{SERVER_NAME} =www.braviy.com
    RewriteRule ^ https://%{SERVER_NAME}%{REQUEST_URI} [END,NE,R=permanent]
</VirtualHost>
Enable the Site and Reload Apache
-
Enable the site configuration:
sudo a2ensite braviy.com.conf -
Disable the default site (optional):
sudo a2dissite 000-default.conf -
Test and reload Apache:
sudo apache2ctl configtest
sudo systemctl reload apache2
Enable HTTPS (Optional but Recommended)
-
Install Certbot (if not instaled in your vps):
sudo apt update sudo apt install certbot python3-certbot-apache -
Generate SSL certificates:
sudo certbot --apache -d braviy.com -d www.braviy.comFollow the prompts to set up HTTPS.
Step 3: Configure the Subdomain
Create a Directory for the Subdomain
-
Create the directory:
sudo mkdir -p /var/www/demo.braviy.com/ -
Set ownership and permissions:
sudo chown -R www-data:www-data /var/www/demo.braviy.com
sudo chmod -R 755 /var/www/demo.braviy.com
Add an Index File
-
Create a basic HTML file for the subdomain:
sudo nano /var/www/demo.braviy.com/index.htmlAdd the following content:
<!DOCTYPE html>
<html lang="en">
<head>
    <meta charset="UTF-8">
    <meta name="viewport" content="width=device-width, initial-scale=1.0">
    <title>Demo Subdomain</title>
</head>
<body>
    <h1>Welcome to demo.braviy.com</h1>
</body>
</html>
Save and exit (Ctrl + O, then Ctrl + X).
Create a Virtual Host Configuration File
-
Create the virtual host file:
sudo nano /etc/apache2/sites-available/demo.braviy.com.confAdd the following configuration:
<VirtualHost *:80>
    ServerName demo.braviy.com
    ServerAlias www.demo.braviy.com
    DocumentRoot /var/www/demo.braviy.com
    <Directory /var/www/demo.braviy.com>
        Options Indexes FollowSymLinks
        AllowOverride All
        Require all granted
    </Directory>
    ErrorLog ${APACHE_LOG_DIR}/error.log
    CustomLog ${APACHE_LOG_DIR}/access.log combined
    RewriteEngine on
    RewriteCond %{SERVER_NAME} =demo.braviy.com [OR]
    RewriteCond %{SERVER_NAME} =www.demo.braviy.com
    RewriteRule ^ https://%{SERVER_NAME}%{REQUEST_URI} [END,NE,R=permanent]
</VirtualHost>
Enable the Subdomain Site and Reload Apache
-
Enable the site configuration:
sudo a2ensite demo.braviy.com.conf -
Reload Apache:
sudo apache2ctl configtest
sudo systemctl reload apache2
Enable HTTPS (Optional but Recommended)
-
Generate SSL certificates:
sudo certbot --apache -d demo.braviy.com -d www.demo.braviy.comFollow the prompts to set up HTTPS.
Step 4: Verify the Setup
-
Test the domain:
-
Test the subdomain:
Congratulations! Your domain and subdomain are now successfully configured on your VPS with Apache 🤩.